Wrye Mash Guide

Foreword
Wrye Mash has been around for years, originally developed and maintained by Wrye. There have been a few versions since, as well as couple of forks. Nowadays, Polemos' fork is the recommended one: it integrated important modding tools such as MLOX and tes3cmd and is actively maintained.
Some prefer ModOrganizer2, an excellent tool as well though it will take more time to do anything as MO2 needs to build the virtual Data Files every time. More importantly, you will still need Wrye Mash to clean saved games.
Downloads and installations
- Head over to the Nexus page of Wrye Mash Polemos Fork or, for OpenMW users the Wrye Mash for OpenMW by Polemos page, and download the x64 manual version.
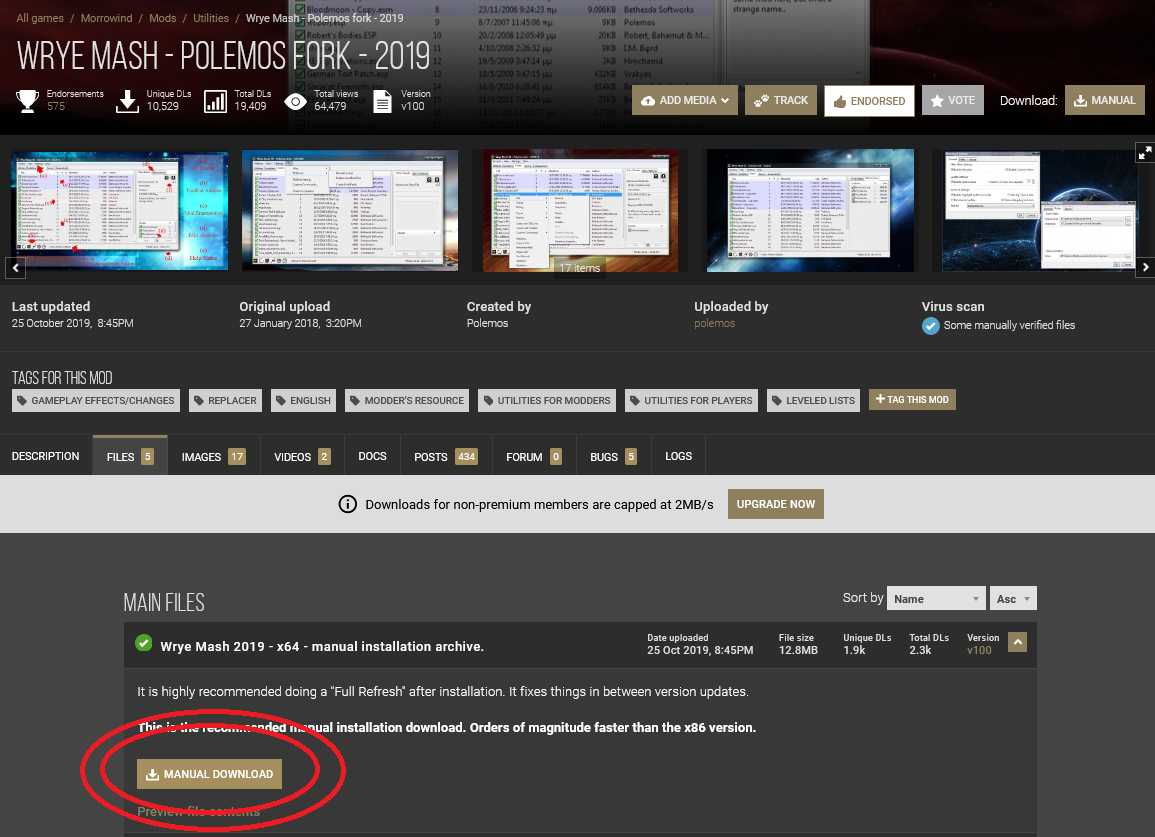
- Open the Wrye Mash zip and extract it to your
Morrowinddirectory
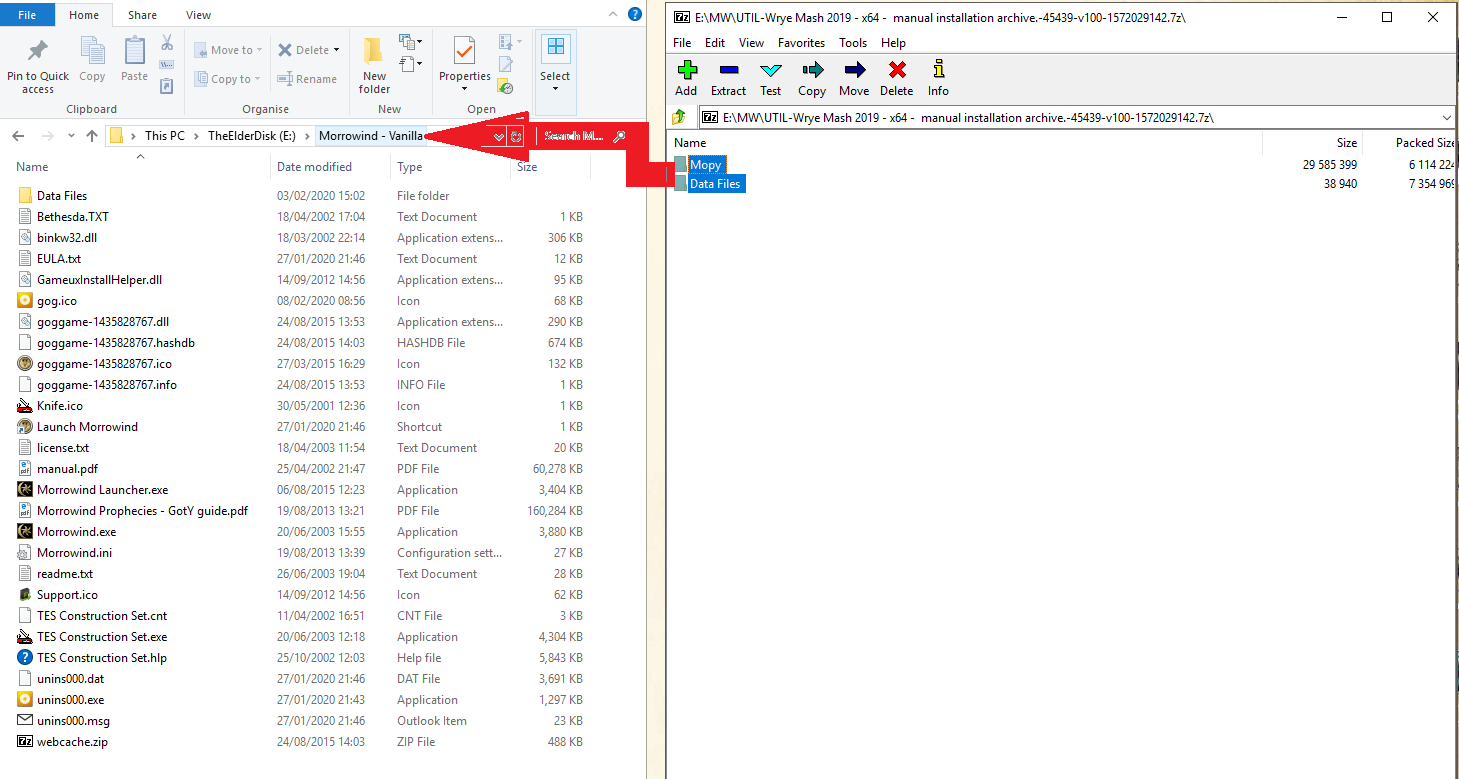
- To start Wrye Mash, you will find the executable in
Morrowind/Mopy/mash64.exe. - OPTIONNAL (and you probably know how to do this but hey) I like to create a shortcut and give it a pretty Morrowind icon since I basically use Wrye Mash instead of the Morrowind Launcher.
- Create an MLOX folder like this
Morrowind/MLOXand download MLOX into it. (It is a single executable files) - Download tes3cmd and extract it in
Morrowind/Data Files. tes3cmd comes as an exe but double-clicking on it won't do much. Originally, we had to open a console and type in commands but Wrye Mash changed this. - At last, double-click on mash64.exe (or your shortcut). Just a few more steps to complete the installation!
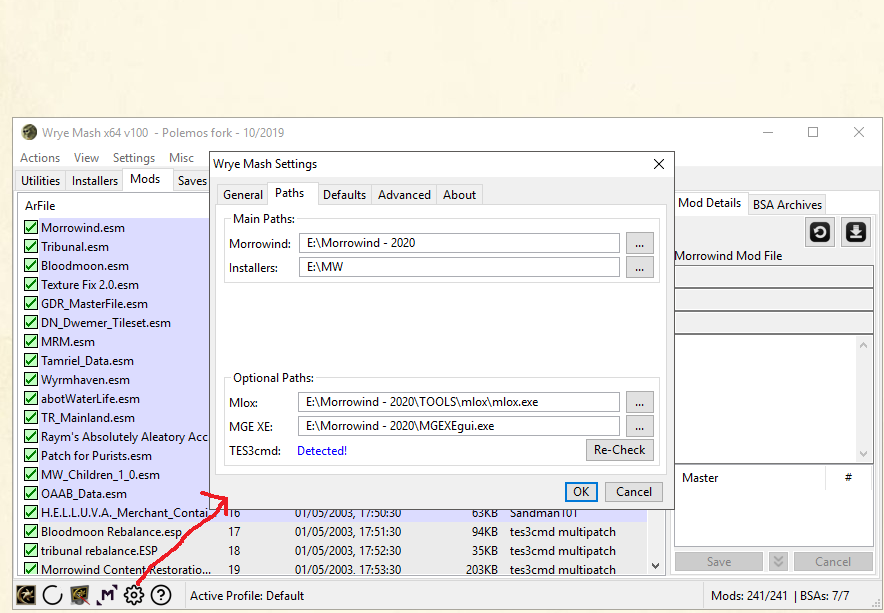
All Wrye Mash needs to know is 1/ Where yourMorrowindis, 2/ where the mods you'll download are 3/ Where mlox is.
If you ever need to change directories, if you decide to store your mods elsewhere for example, click the cog icon at the bottom of Wrye Mash, select the paths tab.

Tabs: Utilities
This is not a must-use part of Wrye Mash but I find it quite handy: it lets us add shortcuts to any utility we want. With this, Wrye Mash become my modding hub while keeping my desktop tidy.
Wrye Mash already knows how to start/use utilities like MGE and tes3cmd and MLOX.
- Go to the Utilities tab of Wrye Mash
- Click "Actions" then "new".
- Navigate to the application you want to add
- click open, then ok
- Repeat for all your tools except MLOX and tes3cmd (and MGE).
Tabs: Installers
Adding mods
- Click on "Installers" and confirm you want to use Wrye Mash to install mods (you'll only need to do this once.
- Let Wrye Mash scan for existing files: it might take a while if you have hundreds of mods already installed)
- There's a few ways we can do this, and the choice is yours. You might not have that many mods and decide to leave the zips the way they are. You could use the separators. You could drag the zip files around to order them as you wish. I decided to add a prefix to the zip files such as REPL-, QUEST-, MAGIC-, etc.
- Creating a marker: Clicks Actions, then Add a Marker, name it (textures, models, new creatures, for testing, HD, needs patch...) and click ok.
- Moving mods around: click and drag or right-click the zip, click Move To, type in the position number, click ok.
Installing mods
- select the mod you want to install
- tick/untick the relevant options and esp
- right-click on the zip again, click install
Rinse and repeat... BUT for every new mod, check the conflict tab
The order of the zips determines their installation priority. If mod 1 has a texture called aa_new_tex and mod 2 does as well, the default result is that the file from mod 2 will be installed in your Data Files.
Install Vs Install Missing Vs Install last
- Install will respect the zip order, effectively overwriting things above, and not installing things that are already below
- Install missing will not overwrite anything and only install files that are NOT in Data Files yet.
- Install last will move the zip down the order to give it installation priority and overwrite anything that is above.
You will notice colours...
Important precision: white means that Wrye Mash installed NOTHING from a particular zip. You most likely did not select any of the packages or esp.
Repacking mods
The grey files need a bit of work to be installed.
- right-click the zip and click repack.
- navigate to Data Files
- click ok
- let Wrye Mash make a new zip
Basically, Wrye Mash needs to see a Data Files folder, or Textures, Meshes, etc... So loose textures will not be identified for example.
Very few files will be packed in such an odd way that you are better off re-building it yourself, especially those with a Data Files folder AND once called Patches or Options...
I've seen Wrye Mash crash rarely with some zips Ozzy's grass and Nerevar say Nerevar for example.

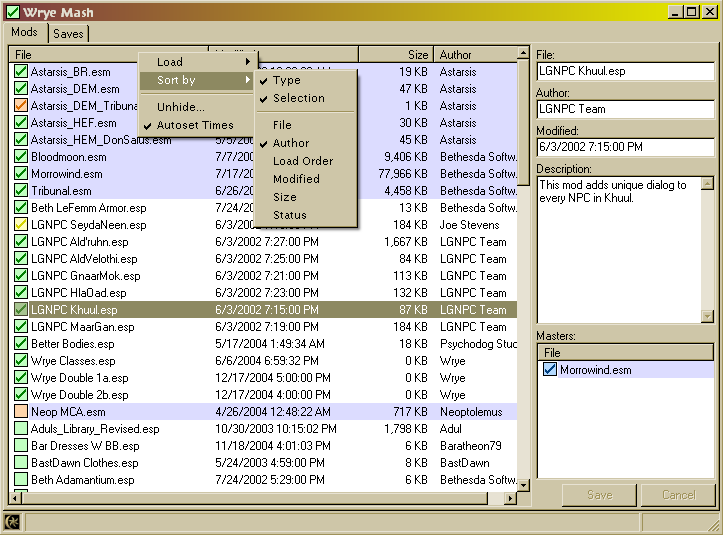
Tabs: Mods
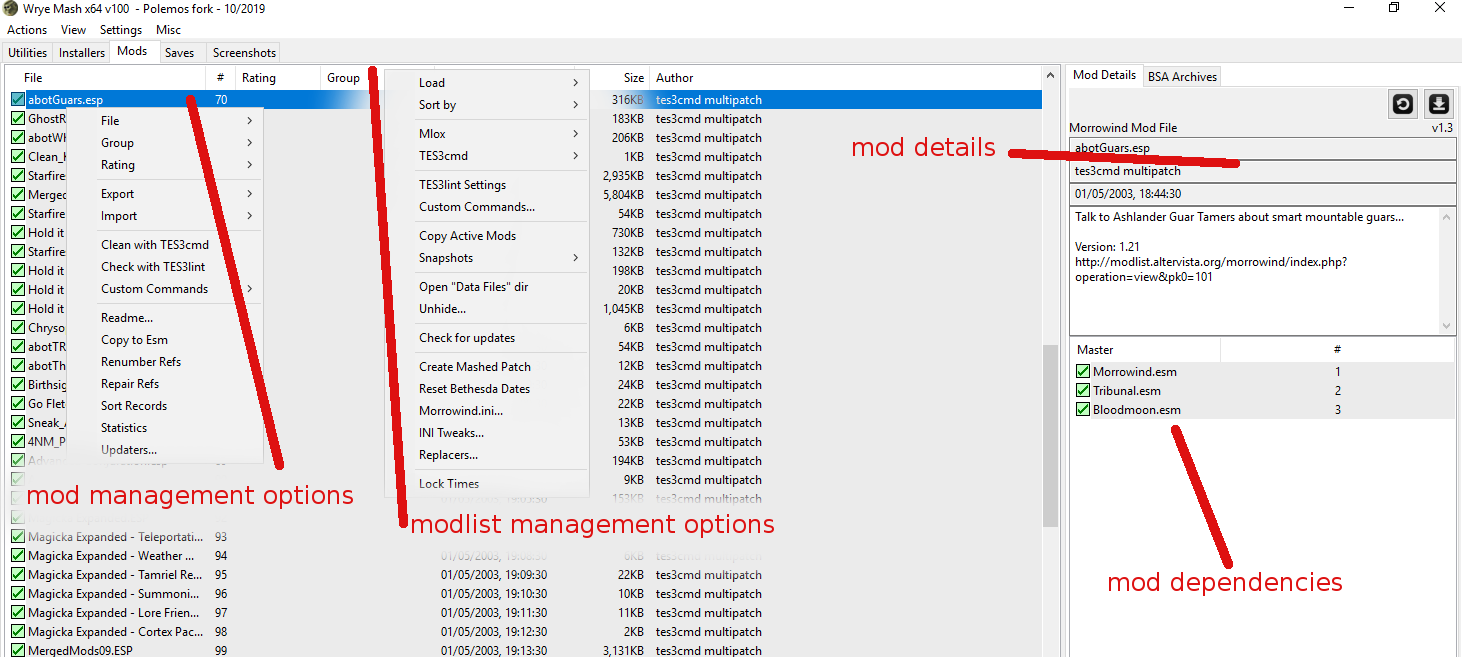
manual things
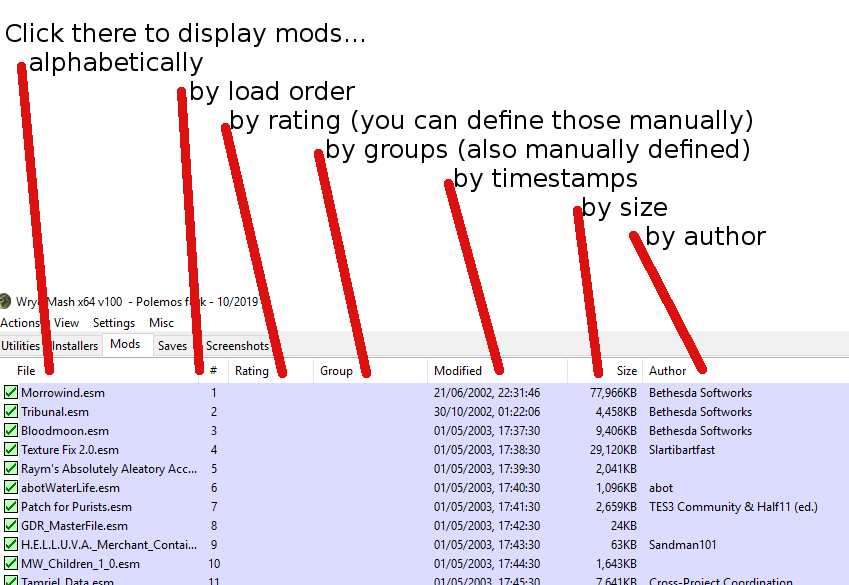
Display mods
You can choose to view your mods in alphabetical order (file), load order (#), timestamp (modified), size and author.
Modified and # are basically the same: when MLOX re-orders your mod, it basically edits their timestamp.
When a mod is edited in the Construction Set, its timestamp is also updated to the current time, pushing your mod all the way down the load order.
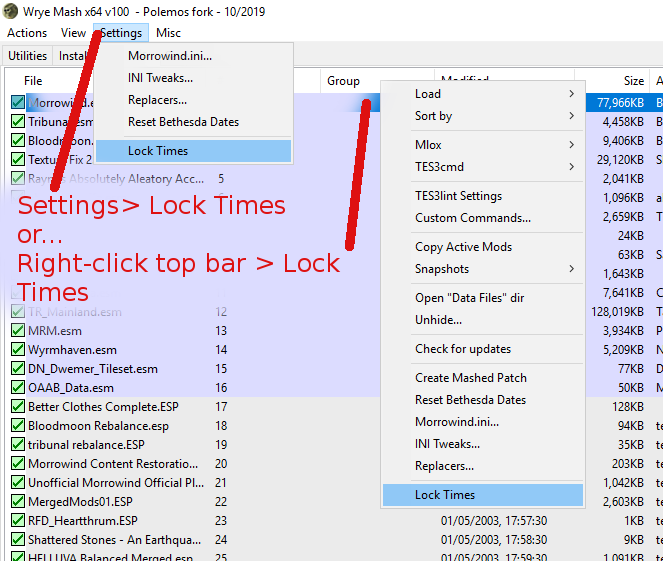
Lock Times
That's precisely why it is good practice to enable the "lock time" option. You can find it under the Settings tab, or by right-clicking on the top bar you clicked on to change how you mods are displayed.
From there on, anytime a programme or yourself changes the timestamp, Wrye Mash will revert it back to the locked time.
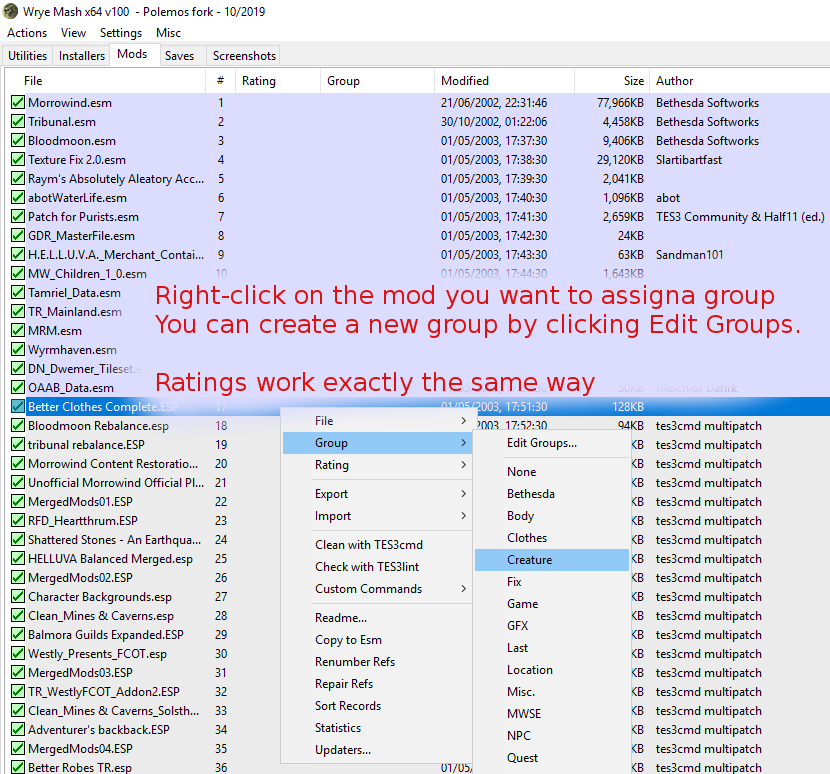
Groups and Ratings
To assign a mod a group or a rating, righ-click on the mod and click either Gruop or Rating.
You can create new groups and ratings if you click respectively on Edit Groups... and Edit Ratings...
I personnally never use ratings but groups can be useful. For example I've created groups called "MWSE" "Distand Land" "Merge Me"...
Click and drag mods
If your modlist is sorted by order (#), you can simply click and drag a mod to modified the load order.
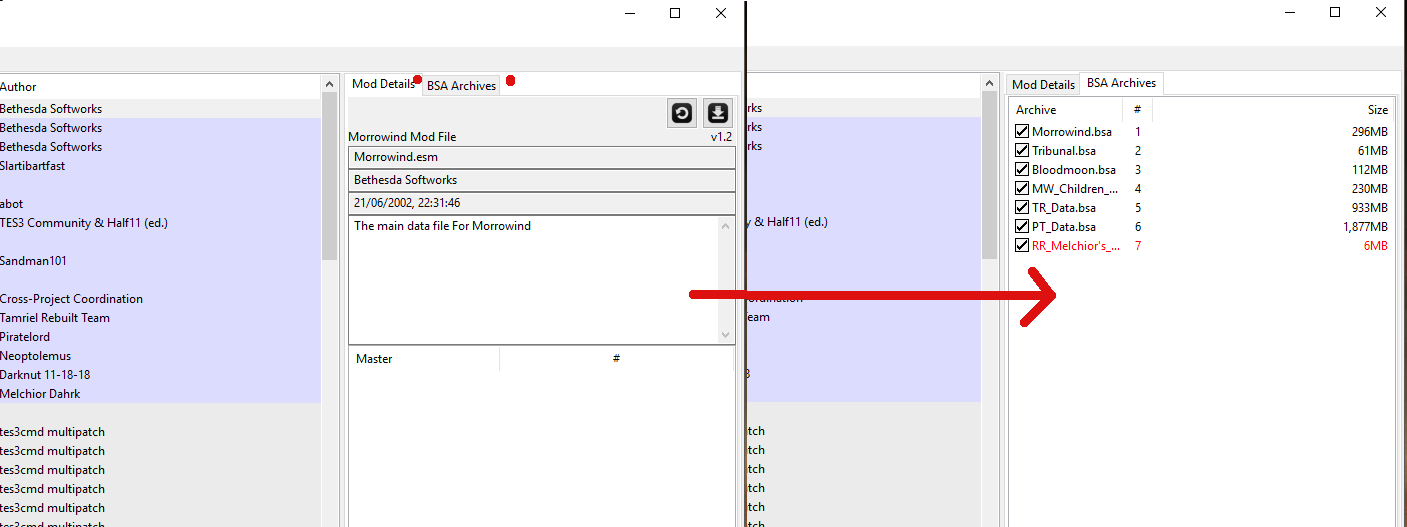
BSA Archives
With Wrye Mash you can enable BSA archives. Previously, you would need to edit your Morrowind.ini or use a separate tool. Now, simply click on "BSA Archiove in the top-right corner of Wrye Mash and enable (tick) the BSA as you would a mod.
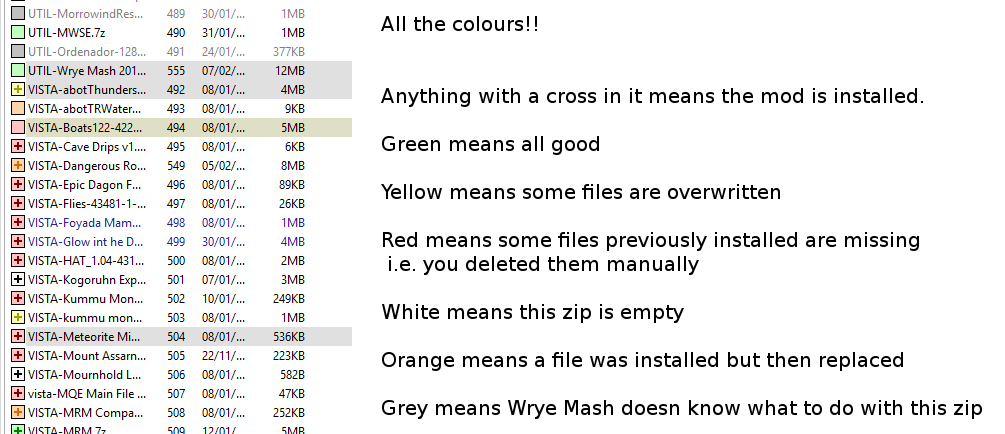
Colours again!
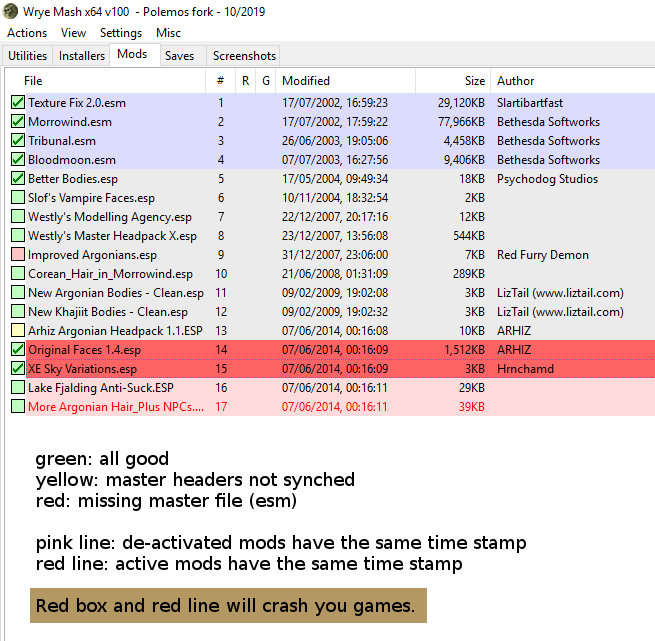
A tick in the box means the mod is enabled.
Green box...
means all good, all the enabled mod need to be green.
Yellow box...
means a master header is not synchronised. To fix this:
- click on the mod
- bottom left corner, click on the list of masters associated with this mods
- click save.
You have just updated the master headers.
Red box...
means the mod is missing a master file (esm). You won't be able to load Morrowind.
Look at the bottom right corner of Wrye Mash to see which master files thos mod depends on.
To fix this, you can:
- install the mod with the missing esm. Typically it is Tamriel
- not use this mod
- IF you know the mod does not actually need the esm, you can untick it in the master list and save. Huge warning, the only way this happens if that you yourself added the dependency by error while loading the mod in the Construction Set.
Pink lines...
means that two (or more) disabled mods have the same timestamp, and will try to load at the same time.
This is not an issue unless you enable both mods.
Sorting your mods with MLOX and click and dragging them manually will fix this.
Red line...
means that two (or more) ACTIVE mods will ry to load at the exact same time. Morrowind won't work.
The fix is easy: as described ablove, either run MLOX or click and drag the mod to re-order.
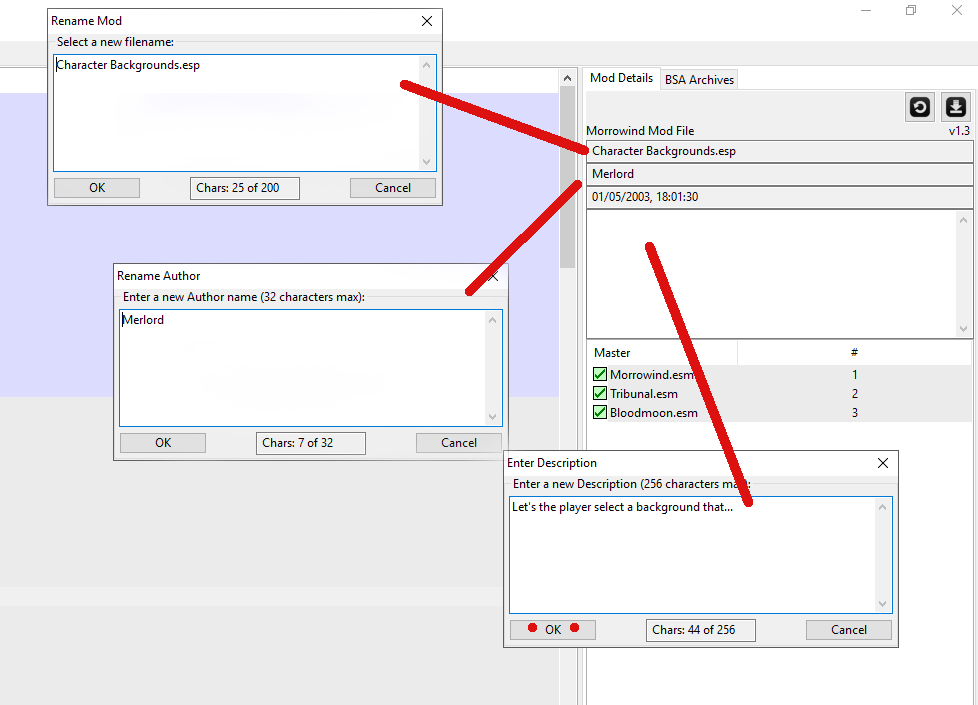
Alternatively, you can manually change the timestamp:
- In the top-left corner of Wrye Mash, click on the date and time,
- change it
- hit 'ok'
You can also edit all the information there: name of the mod, author of the mid and description of the mod.
I only ever add a description if the mod had none and its name if something mysterious like aftg3.esp.
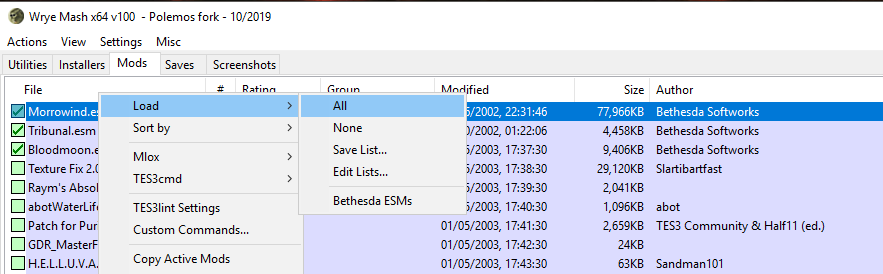
Enable all or none
You can enable all your mods all at once as well as disablethem all:
Right-click on the top bar >Load> All or Load>None.
Integrated Automated things
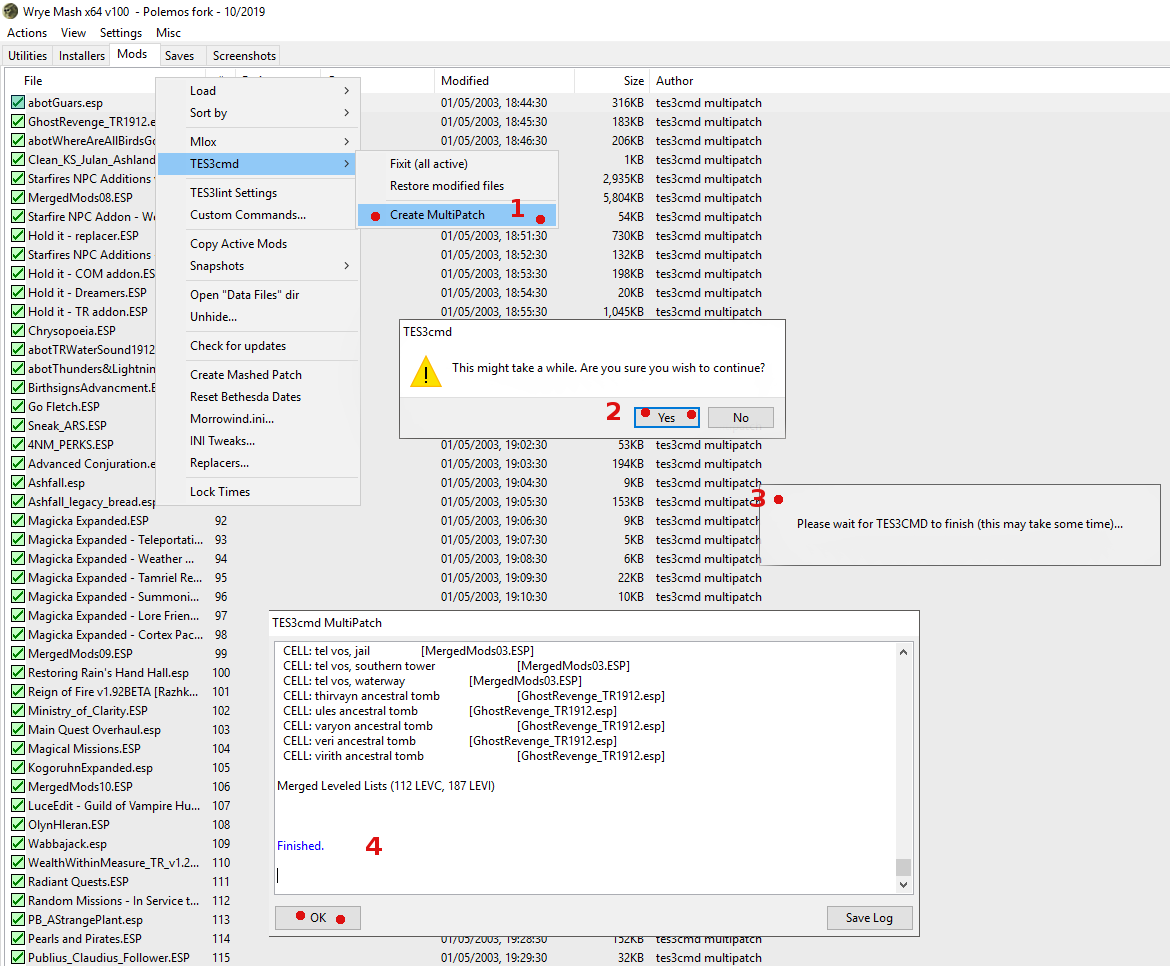
multipatch
This comes with tes3cmd. Orginally tes3cmd only worked via command line, I used to create little .bat files to avoid commad line but with Wrye Mash, it's even easier!
The multipatch will merged your levelled lists (levelled itesm and levelled creatures) as well as fix common issues (defogged cells and summon creatures chiefly). To create it:
- Right-click on the top bar > TES3cmd > create multiplatch
- Click ok
- Wait
- Done!
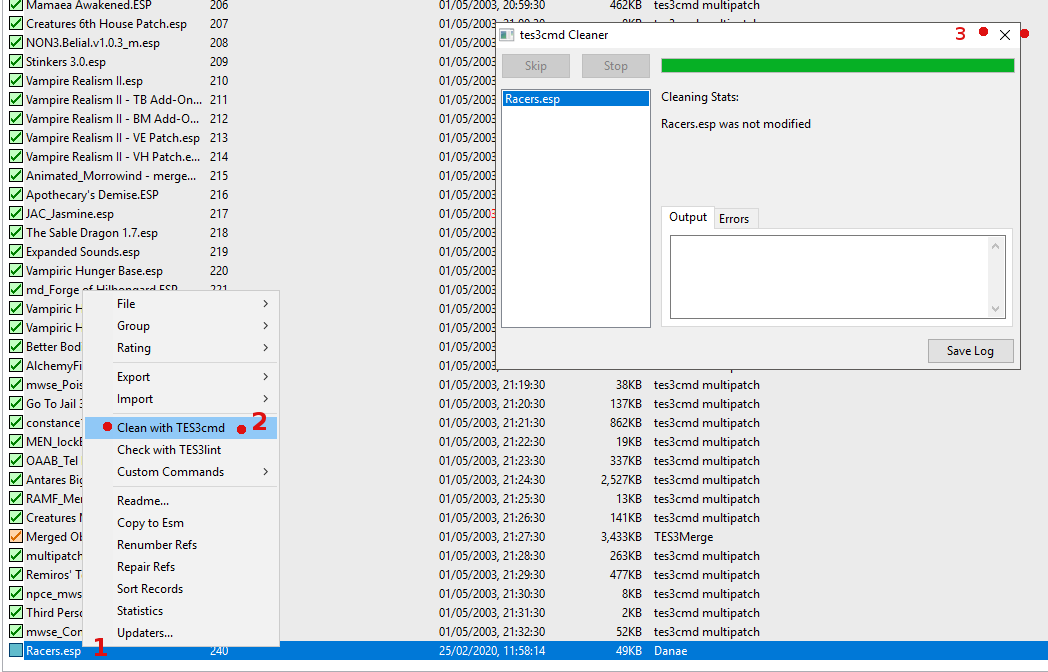
Mod cleaning
This also comes with TES3cmd.
- Right-click on the mod you want to clean
- Click Clean with tes3cmd
- A window opens, wait until done
- Close window.
mlox
Mlox will sort out your modlist based on the many rules it has collected over the years. Sadly Mlox doesn't know the more recent mods, but it is a good place to start.
Here is how to let MLOX do its thing:
- click the M icon in the bottom left corner of Wrye Mash. You can also find it in the modlist menu.
- Let mlox open and click on 'update load order'.
- Once done, close Mlox
- Close the pop-up window in Wrye mash.
Tabs: Saved Games
Colours!
We want blue or green saved games.
Orange means the order of the master files is different:
Update the master list to fix: click on list, click save
Red means some mod the saved games depend on are missing:
Enable/install the missing mod or update master list
Removing or even modifying a mod in a saved game file is a risky business. Reapairing your save
To see the missing mods, look at the list of masters on the right-hand side:
- the missing mods are red
- the mods in a different order than the saved game are orange.
- Yellow means the headers of that mod have not been updated.
- Blue and green are good.
Repairing the Saved Game File
The Repair All option will basically compare the data in your saved game file and the data from the master mods. rematch what was mismatch and delete unused references.
While this certainly helps maintain a mod stable game, it is not a miracle.
Not changing mod during a playthrough is still the best option.
- Make sure the master list is updated (masters are blue, esp are green)
- If not, click in the list of masters, click save.
- Righ-click on the saved game file, click Repair All
- Wait. Done